


When you are sitting at Thanksgiving, politics is generally off the table for a topic of conversation... especially this year! In San Diego, where it is always sunny, weather isn’t really a good topic either. So one of the things left to talk about is work.
I strike up a conversation with my brother and he says to me “Remember when Iain was showing off his California missions project last year with his Wixie project and map? Wouldn’t it have been neat if each time he showed a new mission in Wixie, a light would show to indicate the location of that mission on his map?”
Before we get to my answer, here is a little background.
My son is currently in fifth grade, so last year, like the other half-a-million California fourth-graders, he did a project on the Spanish missions. This project usually consists either of a model of an individual mission or a map showing the location of each mission in California.
My brother is Roger Wagner, the inventor of the HyperDuino, a programmable easy-connect system for the Arduino. The HyperDuino allows students to use curriculum-based physical models and poster board displays as the foundation of their makerspace activities.
So anyway, Roger goes on to tell me that if the URL changed for each page in a Wixie project then it could be combined with a HyperDuino to control LEDs on the mission model.
At this point I am thinking about my trips to museums in the 1970s when I pushed a button on the side of a big diorama and a light somewhere turned on. Where was Little Round Top? Push. Oh, there it is.
And he is right…that would have been neat.
Fast forward to today. With the latest Wixie update, when viewing a Wixie project URL the web address now changes for each page. You can combine that with the HyperDuino extension for Chrome to use Wixie to control LEDs in physical models.
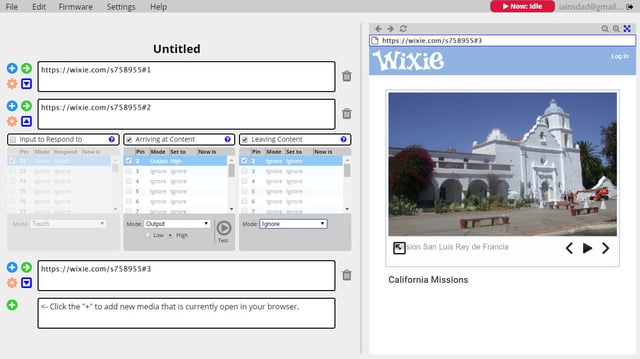
With the combination of Wixie and the HyperDuino, you can connect your existing curriculum, your Chromebooks, and your makerspace by combining physical models, maps, and dioramas with student-created digital content. Students can use Wixie to enhance their learning with digital content to explain concepts in their physical projects.
To get the project URL that you can use with the HyperDuino, go to the Send menu in Wixie and choose Copy Project URL. Then paste that URL into a new tab in your Chrome browser, open the HyperDuino extension and start building your project.